Interactive map of LabSplits controls
Hover over any element in this picture of a LabSplits unit to see what it is; click for more information.
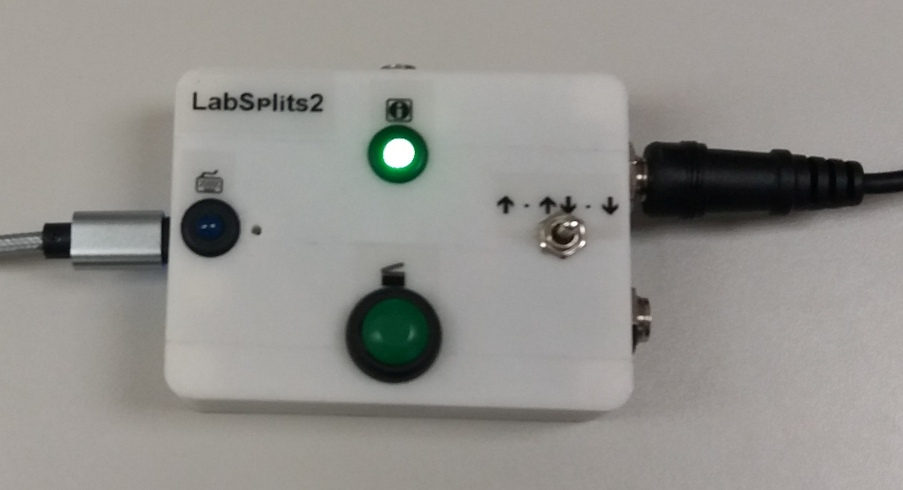
Hover over any element in this picture of a LabSplits unit to see what it is; click for more information.
LabSplits is normally powered through its USB port, but you can use this barrel jack (2.1 mm, center positive) to power it in "untethered" mode (or to suspend typing for inproved timing precision).
Lights whenever one or more event times are ready to be typed out. Normally, it blinks briefly for each event, but if events pile up faster than your computer can accept them, the data light will remain on until all events are typed out (or cleared). LabSplits can remember (buffer) up to 250 untyped events.
LabSplits types its times into your computer through a standard micro-USB port. (To your computer, LabSplits looks like an ordinary USB keyboard.) LabSplits is also powered through this port (except in "untethered" mode).
As an example, this picture shows a Pasco photogate cable plugged into the upper sensor jack.
Any TTL sensor (+5V high, 0V low) can be plugged into either of the two jacks on the right. These stereo phone jacks normally are wired using the Pasco digital sensor convention (Tip = +5V, Sleeve = Ground, Ring = signal)…but you can change that when you build yours.
A small LED visible through this hole will turn on or off whenever a sensor in either jack changes state, even when LabSplits is not recording. (This is not used in normal operation, but can be helpful with troubleshooting or with setting up difficult experimental configurations.)
Starts timing (if stopped) or stops timing (if started). If LabSplits is in an error condition, clears the error (or tries to) and puts LabSplits in standby. When starting timing (but not when stopping or clearing errors), untyped events are discarded and the internal clock is reset. [There is a build option for using a toggle switch or button instead of the usual momentary pushbutton.]
Indicates the state LabSplits is currently in:
| Steady green (or yellow): | Ready to start timing. |
| Steady red: | Actively recording/timing events. |
| Flashing green (or yellow): | Buffer overflow. (No new events will be recorded, but events already recorded can still be typed out.) |
| Flashing red: | Internal error. |
Selects whether you time only rising transitions (left), only falling transitions (right), or both (center). "Both" is usual, but monitoring only one or the other can help prevent buffer overflows when many events occur rapidly.